Thursday, September 24, 2009

Mega Assignment part 2

So, yesterday Ms. Silverman gave us our two part assignment.
the first part was to find a photoshop trick that you didnt know, try it out and blog about it.
the second was find a photographer and blog about their photography, as long as you liked what you saw. I decided to do the second part first because, im cool like that, and because if you know me at all you know that im picky with what i do.
I chose Mary Ellen Mark because I find her work very humourus and simple.


Mary Ellen Mark focuses manly on social issues like homelessness, loneliness, drug addiction, and prostitution. She works primarily in black and white. She is better known for her photojournalism,portraiture, and advertising photography.


Mark's photographs speak to you and touch a place in your heart. When I was looking through her photos I found that she had really, cute and heart warming pictures. Mary Ellen shoots a lot of movies capturing perfect moments that are never to be forgotten.This photo inperticularly, shows that there's a lot of tension with all the people maybe as if their at a funeral and this one man, is just goofing off, making faces to this man who maybe is his boss or even father.

Mary Ellen Mark has some very intense photos that make you open your eyes to what's around you and what's going on in the world. So check her out because she's a photographer you don't wanna miss out on.

Random Album cover #3


Always be different is an alternative power pop group. They focus on deep meaningful lyrics and a hard happy go lucky beat. They're the Band that creates the song that can't get out of your head, and is everyone's favourite ring tone. All it Takes is a fairly new band that is focusing on breaking the mold, the small town group from Bracebridge,Ontario has finally made a first album and chose to go classic with a downward spiral staircase, showing the issues they've gone through. Using a pink colour for the resemblance of pride, and showing layers of their personalities showing that their soft and understanding. They decided to name the album always be different, because they wanna change the world and break the mold. thus fore, All it takes.

Monday, September 21, 2009

Random album cover.


On my first site, that i had gone too it had popped up as Green Bay. So that was how I got my band name. Then on the second site which was random quotes I scrolled down to the very bottom. The quote was " Someone is boring me. I think it's me" I took the last four words and that was my album title. I then went to flicker and went to the most recent found the third photo and then I had first gotten some guy taking a bong hit, so i refreshed and got a pink blackberry and keyboard. I did it once more and got this photo. I added some shading on it, and viola!
my album cover.
I believe that Green Bay is a down to Earth more love song type of Country music. With the mellow colours, and the sunset Green Bay represents love, peace, and original soul. The light shades with soft handwriting completes the album cover getting people across the world excited for Green Bay's excentric sound.

Friday, September 18, 2009

Celebrity Photo

In class today, we were assigned the duty to take one or two of our favourite or most hated celebs and put them into a totally wacky situation.
I used the handsome and talented Christofer Drew or as most people know him, Never Shout Never. He's a small town boy from Joplin,Missouri and is way talented. He got Famous off of YouTube, and eventually got signed.I decided to put him where I did because of the fact that he IS from a small town and Japan is like the Asian N.Y.C. Who wouldn't wanna be there? Fans of Christofer Drew know that he has amazing photo shoots and so I took one of my favourite photos and put him with a dinosaur in Japan.
It looks better then how I just said it, so scroll down and read the steps I did to make NeverShoutNever in Japan.


STEPS!

1. I picked my favourite photo off the web and took it to photo shop.

2. I found a ballin' t-Rex and took him to photoshop too.

3. I first wanted to put him in Egypt cause, how funny is that ? But then, I went and put him in Downtown Japan.

4. I cut out the dinosaur first and used the transform tool to make him a bit bigger.

5. I used my handy dandy eraser and went over the dinosaur going over pretty much every little part until he was perfect.

6. I moved him to Japan, looking fierce waiting for Chris Drew.

7. Then I cut out Chris Drew with the magnetic Lasso just like the Dino and I had to to a lot of editing on it with the normal lasso pressing SHIFT to get everything perfect.

8. I shrunk him down, erased the parts I didn't need, and put him right in between the t-Rex's mouth.

9. VIOLA! bada Bing bada boom the process was complete.


Wednesday, September 16, 2009

Obama :)

So,
In Comm. Tech class, the past few days we've learnt about photoshop.
Ms. Silverman gave us two photos of Barack Obama and the great wall of china.
We had to go step by step using our new knowledge to transfer Obama to the great wall of China.


The first time we did the photoshop exercise we had it so that, we just cut him out, shrunk him and stuck him to the great wall. I liked it that way, it was easy and simple. My favourite.
The second time we had to do it, Ms Silverman gave us new steps using a tool called masks, or extract. Our little class of 12 pretty much got jumbled with frustration, but it was a learning experience.

So without a further a do, i give you the steps I used for both photos.


PHOTO 1


1. I selected the photos I needed, from the pick up folder on the computer.


2. Then, I went to my tools menu and chose the magnetic lasso.


3. I slowly went around his body, trying not to cut any of him off. ( that didn't go so well)


4. After when he looked like he had an army of ants around him because of the magnetic lasso
I went, and chose the normal lasso.


5. With the normal Lasso I pressed shift while getting the pieces i needed that I had cut from his body.
6. I needed certain parts of the background cut out that i had gotten while going over Obama, so I pressed
alt and went over the parts I didn't need.


7. Once he was perfect I used the move tool and moved him onto to the great wall of china.


8. Now, Obama's on the great wall of China, but he's HUGE. So I went to Edit then transform and chose scale. While holding down shift I made him smaller and proper to the fit the photo.


9. I looked him over finding any problems I could and placed him where I wanted him.
Then Viola! Obama's at the great wall of China .
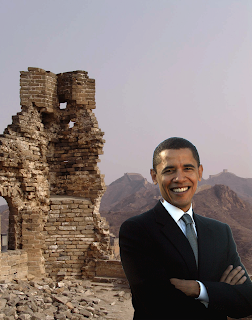


Photo2


1. I selected the photos I needed, from the pick up folder on the computer.
2. Then, I went to my
tools menu and chose the magnetic lasso.
3. I slowly went around his body, trying not to cut any of him off. ( that still didn't go so well)
4. After when he looked like he had an army of ants around him because of the
magnetic lasso I went, and chose the normal lasso.
5. With the normal Lasso I pressed shift while getting the pieces i needed that I had cut from his body.


6. I needed certain parts of the background cut out that i had gotten while going over Obama, so I pressed alt and went over the parts I didn't need.
7. Once again, when he was perfect I moved him over with the
move tool.


8. Noticing that this time he had a little bit of a Halo I maximized him and with a small eraser I went over his whole body getting rid of the halo.


9. After I was done I shrunk him down, moved him where I wanted him and made sure it looked good.


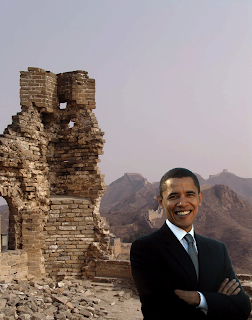
Viola! Once again, Obama's on the great wall of China.